How to install WordPress on your hosting?
Control Panels
The WordPress installation can be done trough different methods, depending on the hosting service you had acquired. Usually, the web hosting companies provide a control panel with the purpose of allowing the user to make the service management. Others, give the opportunity for you to choose the hosting control panel. In this article, you will learn how to install WordPress on your web hosting trough cPanel.

WordPress Installation on cPanel
To install WordPress, you just need to do the following steps:
1. Go to your hosting panel and put your access credentials;
2. Locate the icon Softaculous Apps Installer and click on it;

3. Click on the WordPress logo;

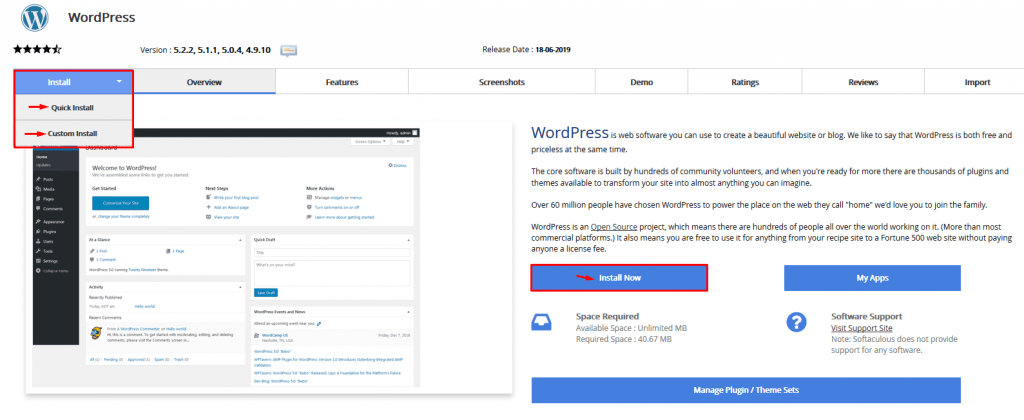
3.1º After clicking on WordPress logo, you will be redirected to a new separator:

- You can choose a Quick Install or a Custom Installation.
- If you click on Install Now, you will proceed to the WordPress installation in the domain that you want.

4. On the other hand, if you choose Custom Install, it will be shown the following configurations:
Choose Protocol: The recommendation is always HTTPS. However, you should consult your hosting provider for the installation of a security SSL certificate, in case, it doesn’t have one.
Choose Domain: Select the domain where you want to install WordPress.
In Directory: Should stay blank in case you need to install WordPress in the root of the domain.
Site Settings: Set a name and description for your website on the following fields:

Admin Account: In this area, you need to define the username, password, and email of the administrator account.

5. Finally, click on install to proceed with the installation of WordPress in your domain. You can also provide an email address in which you’ll receive your WP installation details.
After following these steps, you installed successfully WordPress in your server. However, if you are using other control panels other than CPanel, read this article from wpbeginner.com.
For more information about WordPress, check our articles here.

